The Battle of Bosworth
Richard III died a valiant death, the Middle Ages ended, the
Tudors began---
But where exactly was it fought ?
In 1973, a very strange thing happened. Leicestershire County Council, searching for land to purchase for their projected Bosworth Field Battlefield Centre, at once approached several of the farmers in the area of Dadlington, a small village more than two miles away from Ambion Hill, the traditional site of the battle. All of the farmers refused to sell, and so the Council eventually settled on the nearest land they could buy, which just happened to be on Ambion Hill itself. But why would they originally want to buy land where the battle didn't happen, in prefrence to where it did happen? Or did they know something we don't??
The traditional story which has come down to us of the Battle of Bosworth tells us that the main struggle was fought between the forces of the Lancastrian Earl of Oxford and the Yorkist Duke of Norfolk, on the north-western slopes of Ambion Hill. The date was Monday, August 22, 1485. Richard the Third, having been on the throne just 2 years, 2 months and 2 days, had ridden from Leicester the previous day with his army and those of the Duke of Norfolk and the Earl of Northumberland. That night-- Richard's last on Earth-- the campfires of the pretender Henry Tudor lit up the summer sky just a few miles away, while under the near-full moon Lords and foot soldiers alike pondered upon the events which awaited them.
The rest we know only too well--- from tradition at least. Richard rose in the twilight before dawn, looking unusually haggard and pale,he complained to his captains of fearful dreams, had no breakfast, heard no mass, and then mobilised his troops. But in the battle which unfolded, Northumberland remained inactive upon the field, Norfolk was slain, and Richard, sensing treason, impulsively charged straight at Henry Tudor and was intercepted by the proclaimed traitor Sir William Stanley, and killed.
Tradition also supplies us with the relative positions of the armies involved. Here is that layout, as it has been related to us over the past century or so by various authors:
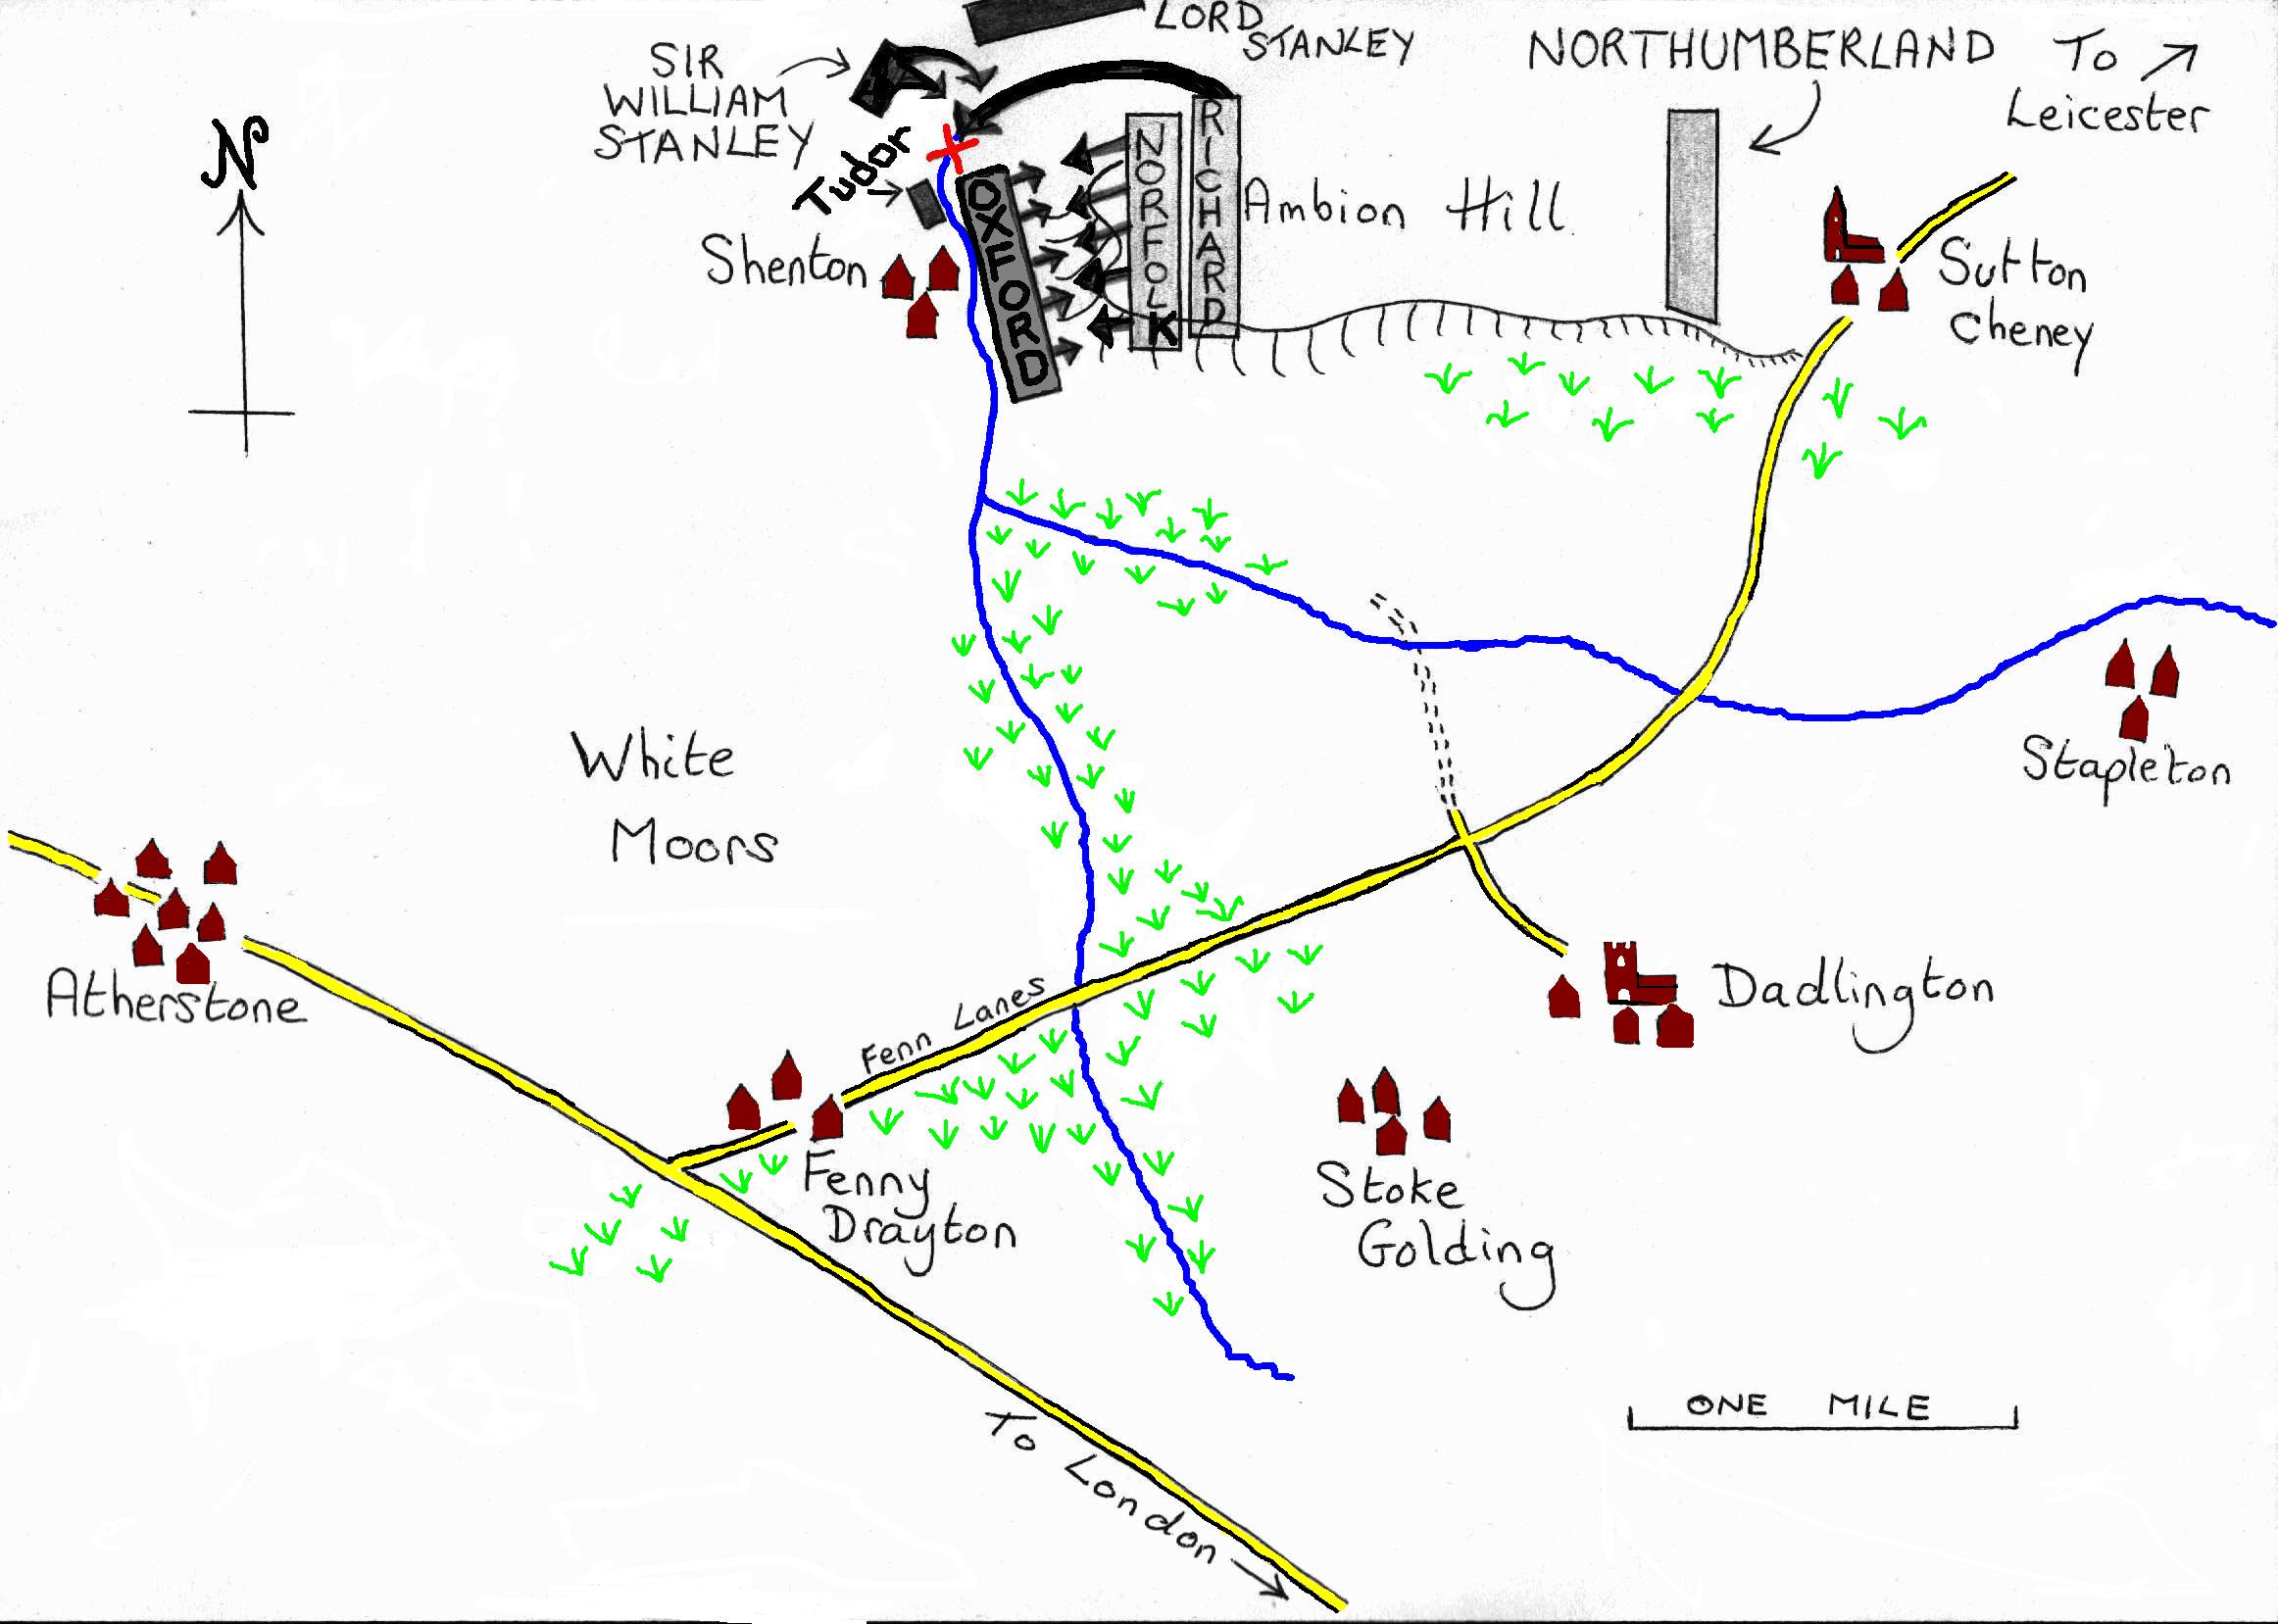
Figure 1: The Traditional (and Bosworth Field Battlefield
Centre's) account of the battle.
This traditional account of the battle of course dates back to well before 1973. When I visited the place again recently, however, I noticed something which I had not seen on my last visit in 1985,namely that here in the real world the place just seemed too small to accommodate the large armies which supposedly fought there. It looked, and felt, to me as though it had all somehow been compressed to fit within and around the boundaries of the Council's land, perhaps just for exhibitive purposes. Somehow, to me, it just didn't seem real.
Upon researching the matter further, I was surprised to discover that in reality not a single contemporary writer makes any mention of Ambion Hill, nor is there any record of any of the dead having been buried at Sutton Cheney church, by far the nearest consecrated ground to the Ambion site. So how do we know that the battle took place on Ambion Hill? Or in that area, for that matter? One does begin to wonder, about the extent to which the author(s) of the traditional story just may have been indulging in a flight of fancy.
On this page, therefore, I would like to examine the feasibility of Ambion Hill as the site of the battle, and otherwise endeavour to ascertain, (if after all Ambion does not fit the facts), by comparing all the known facts to actual maps of the area, just where the battle is most likely to have actually taken place.
![]()
Perhaps surprisingly, contemporary or near contemporary facts relating to the battle turn out to be very few indeed. To begin with, then, here is the summation of all that we actually know:
Ancient Sources
1) Richard III came from Leicester with his own army and those of the Earl of Northumberland and the Duke of Norfolk. (Polydore Vergil)
2) Henry Tudor came along the ancient Roman road from Atherstone, and encamped at a place called White Moors on the night before the battle. (Polydore Vergil)
3) On the morning of the battle, Richard's combined forces were drawn out into a long host, which to the opposition seemed a very imposing sight. (Polydore Vergil)
4) The Ballad of Bosworth Field, which probably dates to about 100 years after the battle, says that Richard's army stood in a marsh before engaging the enemy.
5) Lord Stanley advanced to a position in between the two rival armies, and there was a marsh between the two armies, which Henry left on his right to use as a defensive barrier, at which point he had the sun behind him. (Polydore vergil)
6) In early 1486, very soon indeed after the battle, Diego de Valera, a Spanish (Castilian) courtier wrote that Richard's great Chamberlain (Lord Stanley) was positioned off to Richard's left, and turned against him in the battle.
7) The Yorkists watched the Lancastrians march towards them past a marsh, whereupon shortly thereafter Norfolk moved forward to meet Oxford's attack. (Polydore Vergil)
8) In 1490, only 5 years after the battle, the Burgundian chronicler Jean Molinet wrote that Richard's host comprised of a vanguard under the command of Norfolk and Robert Brackenbury, and a rearguard, and that the king had many cannon, the firing of which forced the enemy to move sidewards out of the line of fire and concentrate instead on the royal flank. He further states that at the end of the battle Richard sought to flee, but his horse was bogged down in a marsh where he was overwhelmed by a Welsh warrior and slain.
9) Robert Lindsay of Pittscottie wrote in his "Historie of Scotland...." (about 1570) that some of the royal vanguard went over to the enemy as they approached, but that generally the fighting was long and bitter and King Richard would not be taken alive.
10) A French mercenary, who fought for Henry Tudor, wrote that Richard attacked Henry's position with cavalry at the start of the battle in a frontal assault.
11) Norfolk was killed in this effort, and shortly thereafter Richard galloped out of the side of the fighting mass, together with a mounted force, and closed upon the position of Henry Tudor, whereupon the force of Sir William Stanley intercepted and killed him, at a place where a brook crossed a sandy track, which place was locally called Sandeford. (Polydore Vergil /Proclamation of Henry VII, 22/23 Aug. 1485)
12) After this, some Yorkists fled southwards towards the village of Stoke Golding, where many skeletons and artifacts have been found. (Hutton)*
13) For the first 30 years after the battle, up until 1511, the site of the fight was named as "Dadlyngton Field". There is also mention of the bodies of the slain having been buried in Dadlington churchyard. (Royal Letter of Licence, 1511, 3 Hen.VIII)
Traditions
15) There is a tradition that the crown was placed on Henry Tudor's head at a place called Crown Hill, which is near Stoke Golding.
For such a momentous event, this doesn't seem much. However, armed with this information, let us now return to the traditional scenario in more detail.
Returning to Figure 1,the Bosworth Field Battlefield Centre has Richard and his forces on Ambion Hill at the beginning of the battle, with Northumberland in his rear, more or less at Sutton Cheney, and Norfolk in front facing Oxford's approach from the plain (Redmore) below the hill. The Stanley brothers, Lord Thomas and Sir William, are both positioned way off on Richard's right, with seperate armies, in such a way that they were strategically placed to intervene on either side. Tudor is placed behind Oxford with a small protective force.
Then, according to the Battlefield Centre, Oxford and Norfolk engaged in battle, and at length Tudor, beginning to despair, rode off with his small troop towards the Stanleys, presumably to plead for assistance, whereupon King Richard, seeing this, galloped down the north-western slope of Ambion Hill with a cavalry force to intercept him. Sir William Stanley, with about 3,000 men, then intercepted King Richard and brought the battle to a conclusion.
However there are many problems with this. Firstly, King Richard could not have been on Ambion Hill at the time of his cavalry charge, because source (4) clearly states the Richard's army stood in a marsh (ie low ground) before the battle began. Source (13) bears this out too, stating that the site of the battle was called Dadlington Field in 1511,not long after the battle. Dadlington stood in marshy ground -- and is a long way from Ambion Hill.
Then, far from the traditional story of Richard's late intervention in the fight, source (10) states that Richard attacked Tudor's position with cavalry at the start of the battle in a frontal assault. It would thus appear that Richard spent the entire battle in combat, (and not supervising it from nearby with his retinue as the traditional story seems to imply), before breaking off from this to arrange and launch his cavalry attack.
Even more seriously, the Battlefield Centre's positioning of the Stanleys cannot be correct either. Source (6), written only a few months after the battle and easily the earliest reference we have, states that the Stanleys were positioned way off to Richard's left-- which places them clear over the other side of the battlefield from the traditional position This in turn of course means that Richard's interception of Tudor's small force --and therefore his death-- cannot have happened anywhere near the traditional area.
Further, source (12) states that some Yorkists fled south towards Stoke Golding. But Stoke Golding is a very long way from the traditional place (marked by a red cross in fig.1) where Richard is supposed to have fallen, and in any case a southward course from here would have taken fleeing Yorkists straight into the enemy lines (fig. 1). But even if we overlook this (!!) their path would take them first to Shenton, which is extremely nearby, then to Fenny Drayton, but not to Stoke Golding. Yet further, it is difficult to see, if the battle was fought at the traditional location, just what on earth Northumberland was doing almost at Sutton Cheney, and yet further, the layout of Richard's forces in Fig.1 is nothing like the long, drawn out line which source (3) speaks of.
There have been many historians who have proffered theories as to the precise layout of the battle, but here I would like to offer the view not of the historian, but of the analyst who is quite adequately in possession of the facts but who also has the logical and analytical approach which is essential to a sensible and realistic solution to any problem.
Consider therefore this alternative scenario, which will also be illustrated in Figures 2 and 3 below:
Referring to Figure 2, suppose that Tudor and Oxford's force was approaching from the west, through Atherstone, as borne out by source (2), with the seperate armies of the Stanley brothers appearing to retreat before it. Notice the canniness of the Stanleys here: To Richard they can say that they are retreating back to reinforce him, while to Tudor they can say that they are bravely marching on before him. Within this plan, notice also how Lord Stanley is in front, and Sir William, declared a traitor only a week before by Richard, is safely tucked between his brother and Tudor.
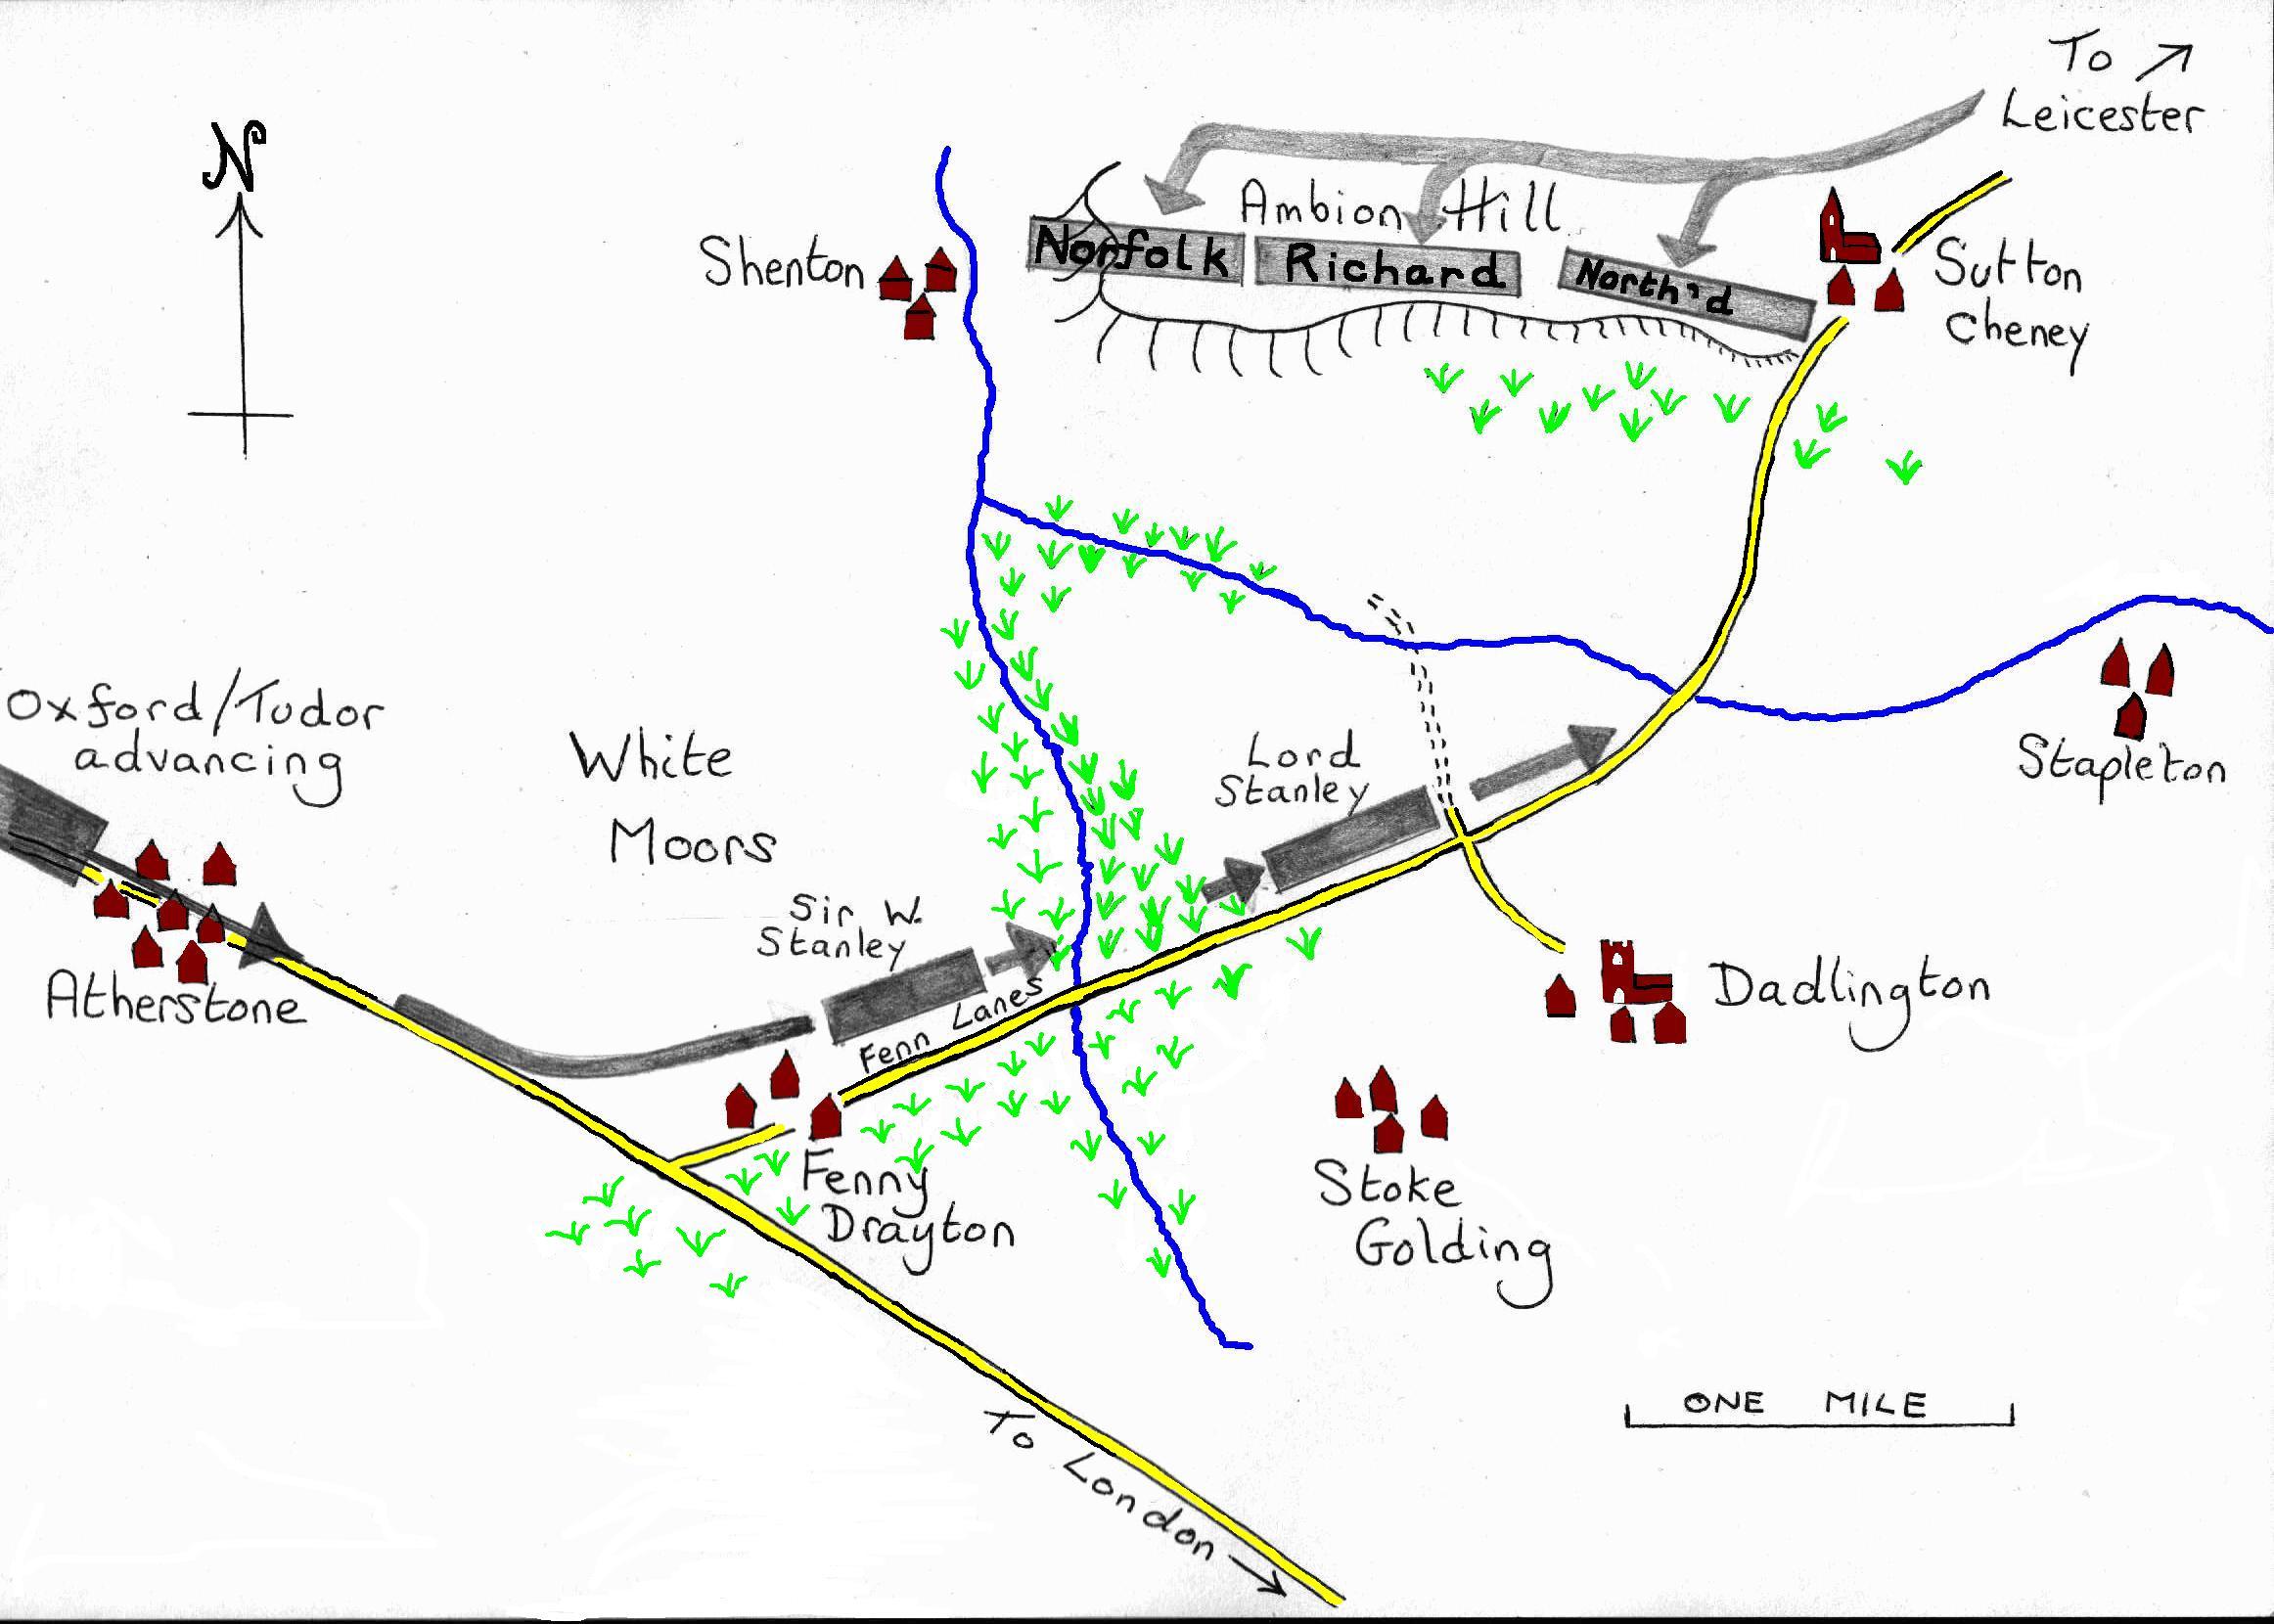
Figure 2
The Stanleys, knowing that King Richard is approaching from Leicester, turn off onto Fenn Lanes, the ancient Roman road connecting Watling Street with Leicester, and march up towards Richards forces. Tudor's forces follow, but seeing Richard's armies long drawn out on Ambion Hill to the north, making a most imposing sight, (source 3), they turn off the road and camp on the White Moors. Meanwhile the seperate armies of the Stanleys camp near Stapleton and Dadlington.
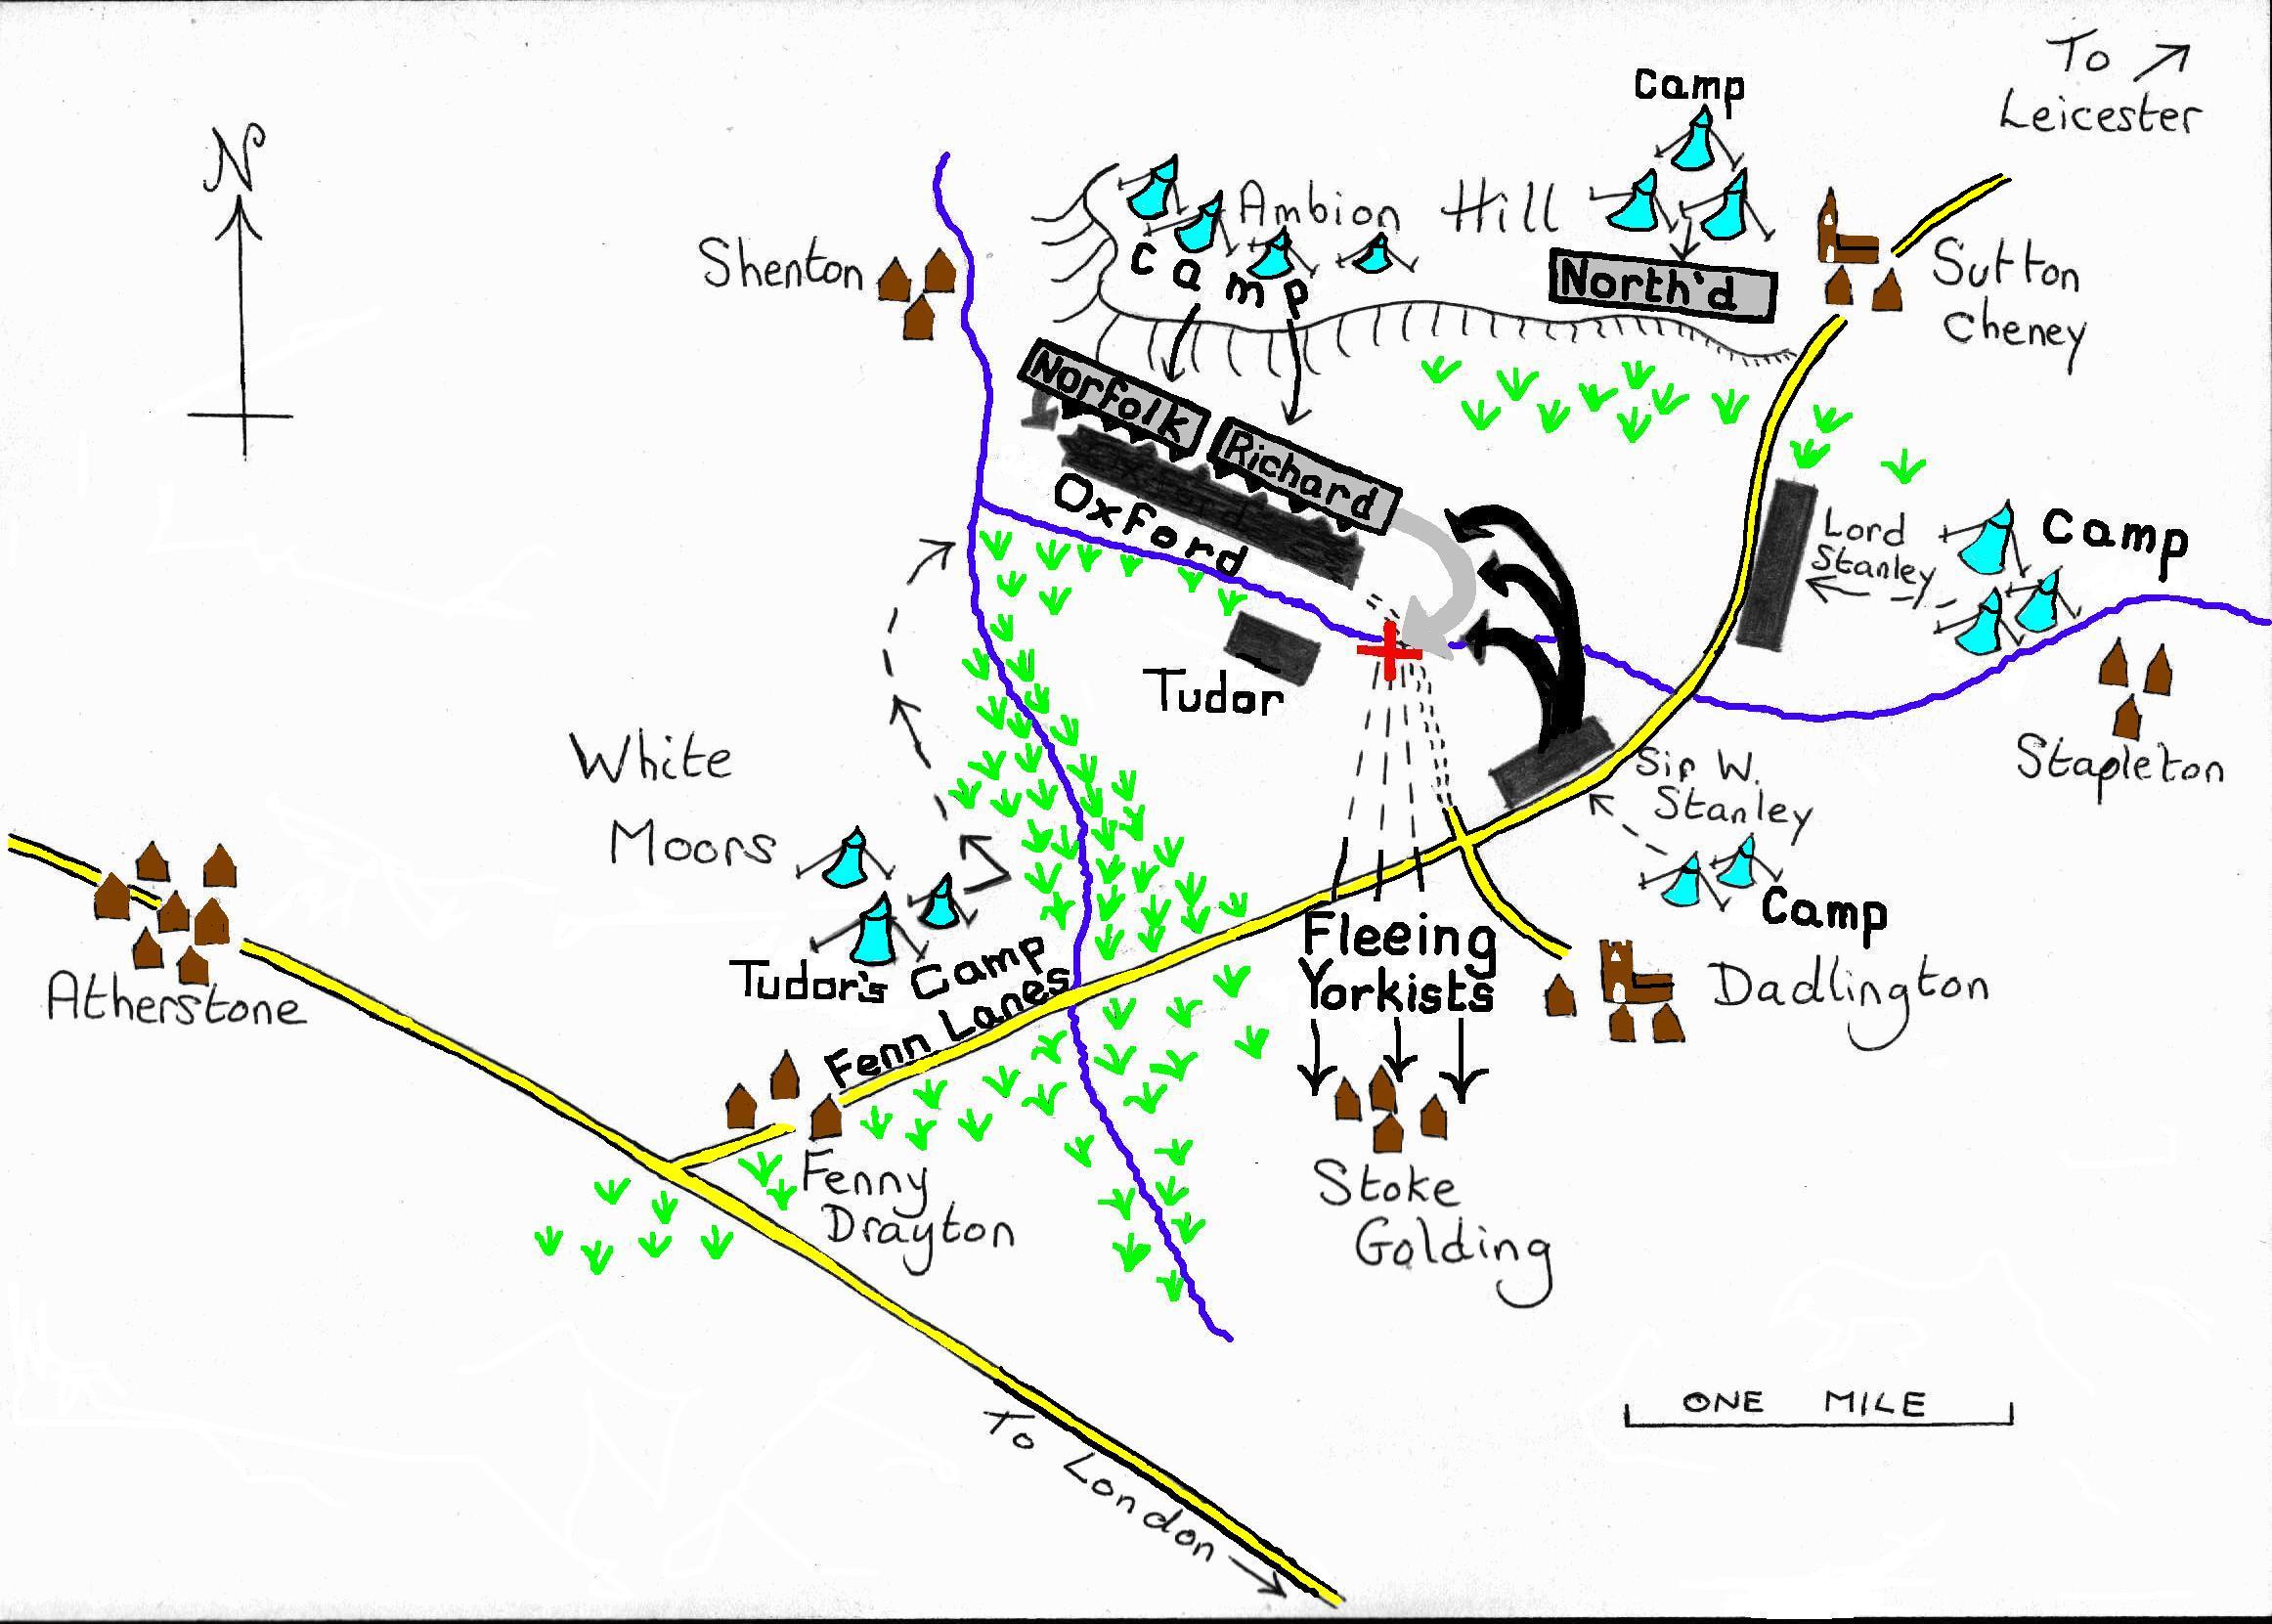
Figure 3
Referring now to Fig 3,on the morning of the battle Tudor and Oxford strike camp and march forward to the marsh which seperates them from Richard's forces, and then turn north-west to skirt the marsh, leaving it on their right, and having then the sun, which had risen slightly north of east but had transited to the south of east as it climbed in the sky, on their backs. This is exactly what source (5) says was the case. Having passed the marsh, they then take up the positions shown above, with Tudor posted off to Oxford's right rear with a small guarding force.
Meanwhile the Stanleys, striking camp, move forwards slightly into their positions, both Stanley hosts being in a position to intervene on either side and Sir William still in a position of safety between his brother and Tudor.
At this time, source (4) states that Richard's forces stood in the marsh (ie had descended Ambion Hill) and faced Oxford. Notice how the Stanleys are positioned off the Richard's left, exactly as source (6) states, and not off to his right as the traditional story relates.
Battle then commencing, sources (7) and (10) state that Norfolk and Richard met Oxford front-on. This is clear from Fig.3.
Meanwhile Northumberland and Lord Stanley find themselves in an interesting fix which may well call into question the various theories regarding their alleged disloyalty. In Fig.3, we can see that neither can move forward to join the battle without running the risk of being attacked in the rear by the other.
This mutual stand-off did not evaporate during the course of the battle, and therefore neither army could move.
Frankly, therefore, if this scenario is correct, we cannot draw any conclusions about the loyalty of either Lord Stanley or Northumberland,--save the fact that they obviously mistrusted each other.**
After Norfolk's death, Richard decides upon his fatal cavalry charge at Tudor's personal force. In fig.3, it is clear that Richard has to ride out of the side of the fighting mass and round Oxford's flank to reach Tudor. And, true enough, source (11) states that Richard galloped out of the side of the fighting mass, towards Tudor, before Sir William Stanley intercepted Richard and killed him.
Notice now, looking closely at fig.3, how there is nowhere for the fleeing Yorkists to escape to out of this melee, except due south to nearby Stoke Golding, which is precisely what source (12) tells us.
Also in fig.3, notice how Richard falls at a place (marked by the red cross) where a brook crosses a road. Source (11) bears this out too, in naming the place "Sandeford", a "ford" of course being a place where a road or trackway crosses a stream.
Finally, there is the record of a mass grave in the churchyard at Dadlington (source 13). This is precisely what one would expect if we look at fig.3-- it is simply the nearest churchyard to the newly-projected site of the battle. Had the battle been fought on the traditional site, however, then surely the church at Sutton Cheney would have been closer. Yet there is neither record nor tradition which says anything about any battle-dead ever having been buried there.
I submit then that this scenario, which is also broadly shared by other analysts, notably the authors Michael Bennett and Peter Foss, fits the true facts as we have them, whereas the traditional account of the battle, as endorsed by the Bosworth Field Battlefield Centre, frankly doesn't.
But this in turn of course doesn't mean that the new site is correct.
Realistically, in the end, as is so often the case, only excavation will actually reveal the truth.
NOTE: This was written in 2002. The battlefield has now been found – at the
place which this essay predicted.
-- Michael Alan Marshall
* William Hutton,
1788. Although skeletal remains and artifacts have indeed been found in that
vicinity, we don't know where Hutton heard the tradition of the southward
flight.
**However the fact that Northumberland was placed under arrest
by Tudor after the battle, whereas Lord Stanley, Richard's own Great
Chamberlain, wasn't, does attest that Northumberland had not treated with Tudor
beforehand in the way that Lord Stanley had. All things considered it seems
that Lord Stanley's loyalties were for (a) himself and
(b) Tudor in that order, and Northumberland's loyalties were for (a)
himself, (b) Richard and (c) Tudor, in that order.